Robo-Tar
Like Us
  • Robo-Tar - Robotic Guitar Assistant
  • RoboTar Store
  • Blog
  • RoboTar Users Guide
  • Contact Us
  • Privacy Policy
  • RoboTar Gallery
  • Returns and Warranty

RoboTar User's Guide

About RoboTar

Congratulations!  If you are here, you decided to be a RoboTar owner and we couldn't be happier to have you.

You've made the step to ensure guitar music is a part of your life and whatever the reason you bought a RoboTar, we know it means a lot to you.

So let's get to it.  On this page, you will find the following:
1) RoboTar Overview - Getting to know your RoboTar
2) RoboTar Hardware Install
3) RoboTar Windows Software Install
4) RoboTar Mac Software Install
5) RoboTar Software Application Download Link
6) RoboTar Users Guide (How to use the RoboTar application)
7) Troubleshooting video links.

Getting to Know your RoboTar

Picture

Installing your Hardware

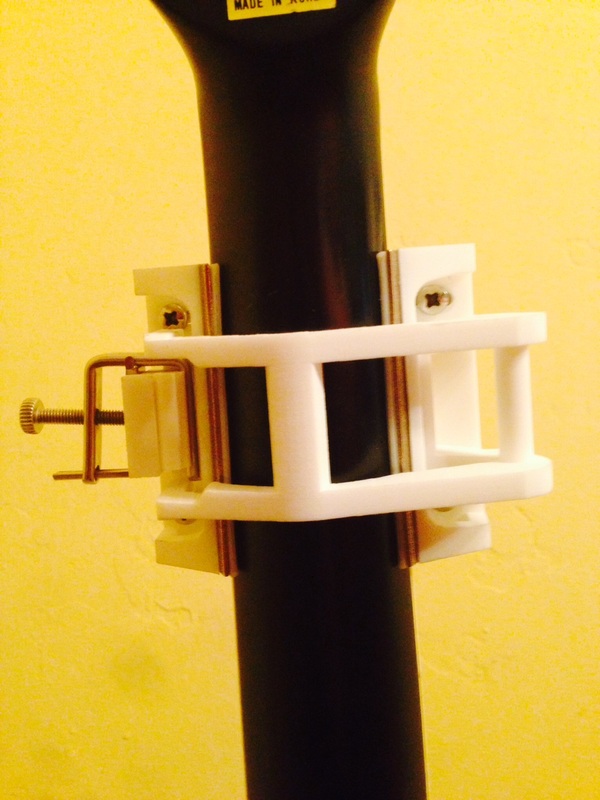
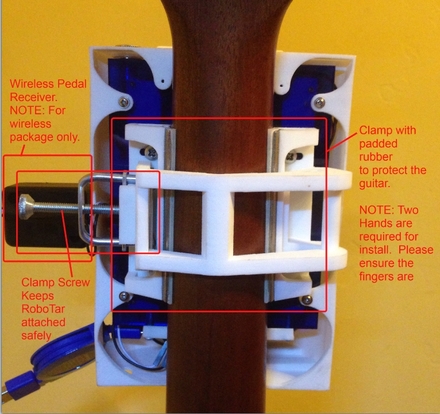
1) Install the Clamp on the guitar first.  The clamp consists of 3 parts (small side, bridge side and screw clamp)  ... we hope to eventually create a quick release clamp but that will take more time.   (We were much more excited about getting RoboTar to you but the complexity of attaching it properly and securely to the guitar has been an unpleasant hurdle).   Anyway, put the small side against the fretboard first, then put the bridge side against the side of the fretboard (the side that has the piece that bridges across the back of the neck to the small side).  Both sides should be evenly butted up against the first fret.    You may need to put the screw clamp onto the bridge side of the clamp first before sliding over the neck into the small side of the clamp.  The picture below on the right includes washers that can act as shims between the clamp and RoboTar.  These can be used in case you need more space between the strings and RoboTar's finger pads.  Remove them if not needed (it is likely you will so I suggest installing with them first, if RoboTar is not pressing on the strings properly even after calibration, then removing them might help).
Picture
2) Once the Clamp is on, you can use the 4 included screws to attache RoboTar to the clamp.  
Picture
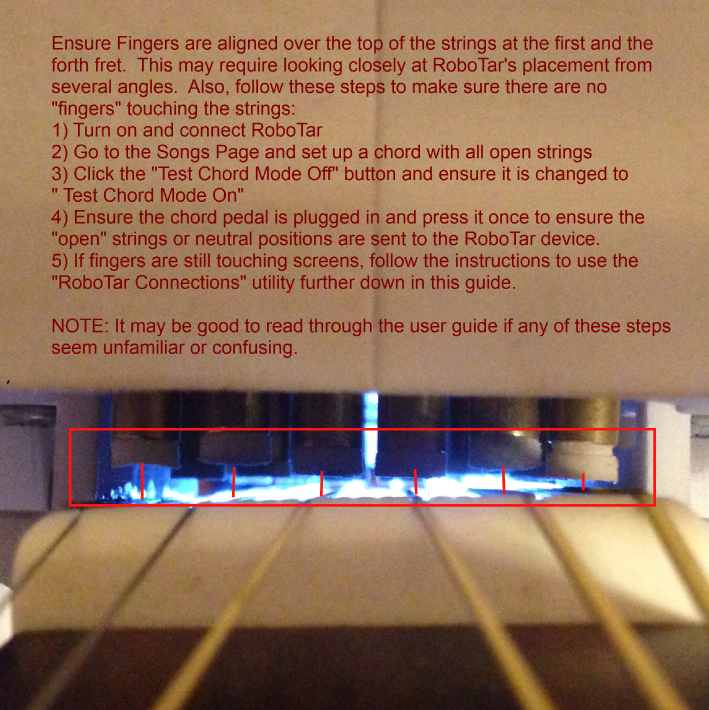
4) Put all 4 screws into the back of RoboTar through the clamp.  However, before fully tightening the screws that secure RoboTar to the neck, do your best to align all of the fingers over the top of the guitar strings as illustrated below.  Sometimes it is easier to see when shining a light from the bottom side of RoboTar while looking through the top (head side of the Guitar).
Picture
Picture
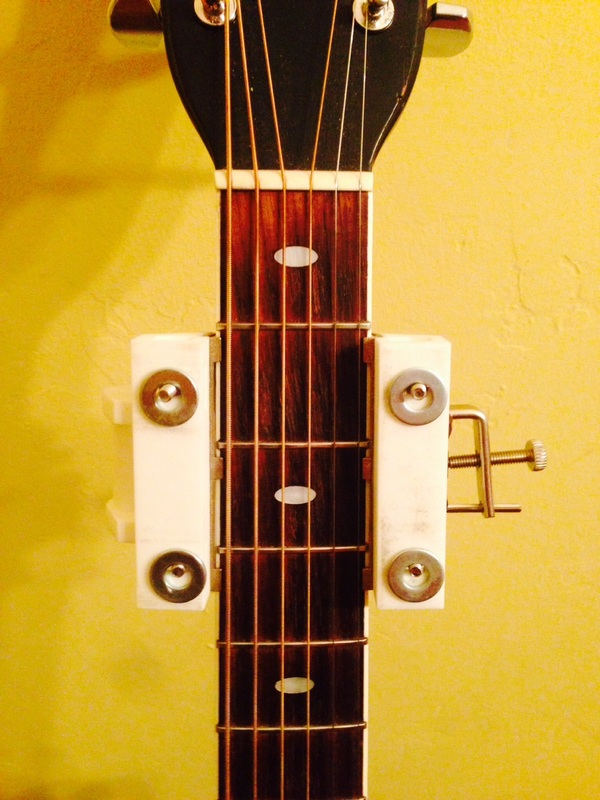
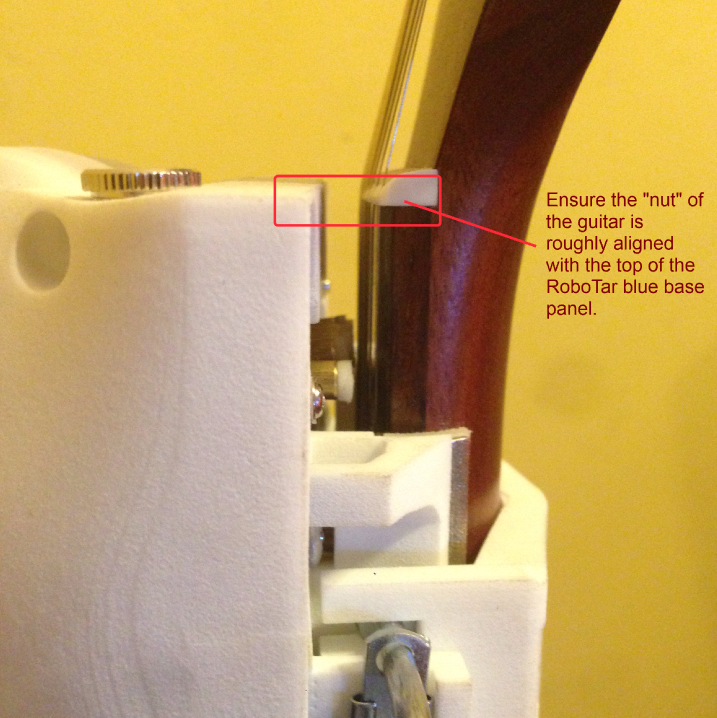
3) The picture below illustrates roughly where the top of RoboTar should be, however, RoboTar might be another centemeter below the nut of the guitar if you place the metal "lips" of the clamp on the guitar body side of the first fret instead of the guitar head side of the first fret.  Either position should work, but if one does not work well for your guitar, try the other to see if it works better.
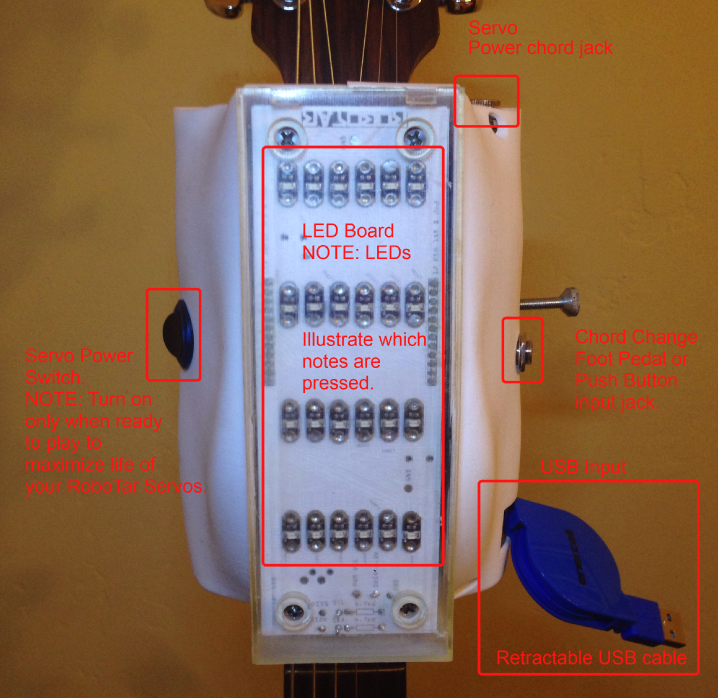
Picture

Connections:

There are 3 connections required for RoboTar:
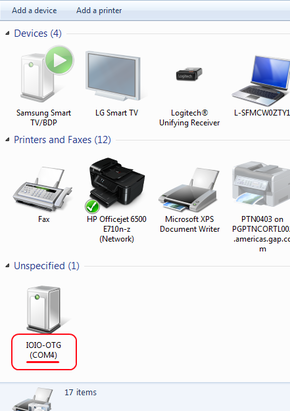
1) Connect the retractable USB connector with the micro USB connection end to Robotar as indicated in the pictures above.  Connect the other end of the USB cable to your computer.  A USB extension cable is also provided so you can have some room away from your laptop/computer.  At this point, you should see the blue switch on top of RoboTar light up.  This light is powered by your laptop/USB connection. 

2) Connect the foot pedal to the input jack on RoboTar.

3) Connect the power barrel jack to RoboTar.  If the software is already running on your laptop, you may hear the servos begin humming.  If you have launched the software but do not hear the servos humming, turn on the large RoboTar power switch.  Please note, this switch is there mostly as a quick cutoff switch.  The software contains logic that will turn on power to RoboTar when the software is connected.  This ensures the Servos only have power when RoboTar is ready.

You are now ready to run the software and begin playing songs!!!  

Keep reading for Software Instructions.

Software Help

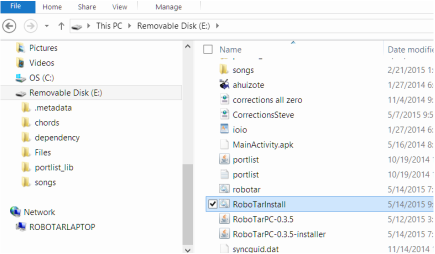
Software Install (Windows):
  1. A USB Drive was included with your RoboTar.  Plug in the drive to the laptop or computer you plan to use with RoboTar.
  2. Install Java:  Download java (jre6) and install using the download from here: http://www.oracle.com/technetwork/java/javase/downloads/java-archive-downloads-javase6-419409.html#jre-6u45-oth-JPR
  3. If you haven't already during the hardware setup step, plug RoboTar into a USB port on your computer.  (See above)
  4. Install the RoboTar Hardware Driver:  On your USB drive included with your RoboTar you will find a file: [USB Drive Letter]:\ioio.inf.  (Install Figure 1:).  This is the driver file for the RoboTar Hardware and it is needed for your Windows system to communicate with RoboTar.  If the Hardware Install Wizard does not start when plugging in the USB cable for RoboTar, launch the Hardware Install wizard in the Windows Control panel to add device.  RoboTar will be seen as "IOIO-OTG" once the hardware is properly installed and RoboTar is connected via USB to the computer (Install Figure 2:).  Note: For Windows 8.1 users, you will need to disable Driver Signature Enforcement.  To do so, follow the instructions at this link:  https://learn.sparkfun.com/tutorials/disabling-driver-signature-on-windows-8
  5. Install the Software: On the USB Drive, use File Explorer to look for the file [USB Drive Letter]:\RoboTarInstall.bat and run this file by double clicking on the file.  (In Windows the icon for this file will look like a square with gears in it).  (Install Figure 3:)  This is a batch file that will create a Desktop Folder called simply "RoboTar" and copy all of the files from your RoboTar USB into this folder.
  6. At this point, the software is copied to your Windows system and the install will begin.  Continue below to the section called "To Install From the Download Link" and start with task number 3.
  7. Please note, When running the software, the RoboTar app will check online and compare your version to the latest version of RoboTar to see if an update is available.  If one is available, you can download the latest version of the software here:         

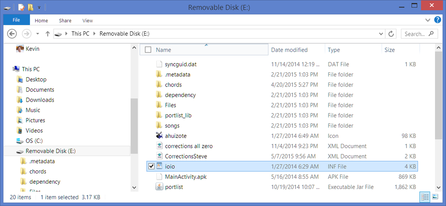
         RoboTar Application Download


To Install From the Download Link (Windows):
  1. After clicking on the "RoboTar Application Download" Link above, select "Save As" option and remember the location where the file is downloaded (a recommended location is "C:\Users\[User Name]\RoboTar\" or search for RoboTarPC-x.x.x-installer.jar on your system (where x.x.x is the version number referenced in the download.  As of this writing, the latest version is 0.3.5.
  2. Once downloaded, use File Explorer to find the file you just downloaded and double click the file.  For example, double click C:\Users\[User Name]\Robotar\RoboTarPC-0.3.5-installer.jar.   This assumes you saved the jar file in the folder mentioned.  [User Name] will be the Name of the user currently logged into Windows and the version may be different if a new version number is available.  
  3. You may be asked if you want to allow the "Java Runtime Environment" to make changes to your computer.  Click "Yes".
  4. You will be asked for your language.  Select English.
  5. You should see a "Blue Ahuizote" logo for RoboTar.  Click Next.  It will install the software in the default C:\RoboTar location.  This is the recommended install location.
  6. You should now see a box asking you for the Port Selection.  This is the USB port where RoboTar is connected.  If you already know from your step #4 in the "Software Install (Windows) (Install Figure 2:) Section above, then enter the COM port number now in this space.  If you do not know this number, look in your Control Panel and look for the "Devices and Printers" option and look for the item called "IOIO-OTG"  then take note of the COM port number (Example: COM1 or COM9, etc.).  Enter this number into the "Port Selection" dialog field.  See Figure Install 3 and 4 to the right:


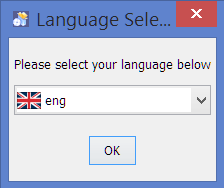
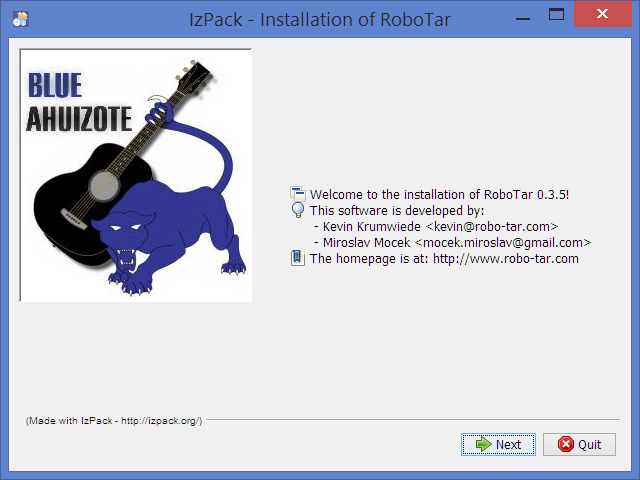
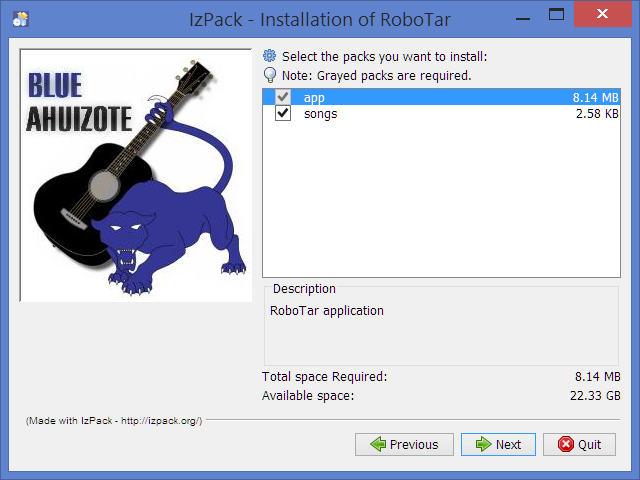
Run the Software (Windows)
  1. Double Click the RoboTar Icon on your desktop to launch the software or look for the RoboTar icon in your Start Menu.
  2. Load your custom "Corrections" calibration file.   The first time you run the software you will receive an error that indicates the "CORRECTIONS.XML" file is not loaded.  This is a file we created specific to your RoboTar.  It helps the servos for RoboTar stay even and apply the correct pressure to your chords.  IMPORTANT NOTE:  THIS IS A CUSTOM CORRECTIONS FILE THAT WAS SENT WITH YOUR USB DRIVE SOFTWARE.  To load this file on your system, at this point you will use your RoboTar software.  In the main menu, use the "Utilities" menu and select the "Corrections" menu item.  You will see a screen that contains all zeros.   Use the "Load File" button and browse to your USB Drive.  At the root of your USB drive, look for the "Corrections YOUR NAME.xml" file, select it and hit ok.
  3. Now you will reset your software.  Click the "X" to exit out of the CORRECTIONS window.
  4. Finally, close and restart RoboTar.  
  5. You are ready to begin playing chords and songs!!
  6. The best thing to do next is to read through the users guide.  If there are any challenges, please do not hesitate to write to life upgrades at info@lifeupgradesgroup.com.  Leave your contact information and a good time to discuss and we will be back in contact with you to arrange for some personal support.


Software Install (Mac): 
  1. A USB Drive was included with your RoboTar.  Plug in the drive to the Mac laptop or computer you plan to use with RoboTar.  Create a folder in your Applications Directory called "RoboTar" and copy the full contents of the USB drive to that folder.
  2. Java Install: Most Macs come with Java already installed so you likely do not need to do anything to install Java.  However, if your install fails (in upcoming steps) you may need to check your version of Java and Download java and install using the download from here: https://www.java.com/en/download/faq/java_mac.xml
  3. If you haven't already during the hardware setup step, plug RoboTar into a USB port on your computer.  (See above)
  4. Hardware Driver:  No additional steps needed for Mac.
  5. Connection: RoboTar will be seen as "IOIO" once the hardware is properly installed and RoboTar is connected via USB to the computer.  If RoboTar is properly plugged into a USB port on your computer, you should see a blue light on the power switch.  A small red light should also be visible inside the bottom of RoboTar on the circuit board.  If in doubt, you can follow these steps to determine if RoboTar is connected:  Open the Terminal.app from your Applications/Utilities folder.  Type the following: ls /dev/tty*  then look for something that looks like this in the list:  /dev/tty.IOIO0830-IOIO-App /dev/ttyt0
  6. Install the Software: In the folder you created in step one, double click the file that looks like this:  Applications\RoboTar\RoboTarPC-x.x.x-installer.jar   (Where x.x.x is the version of the install file.  The version number is 0.3.3 at the time these instructions were written.  This is a jar file that will create a folder inside your Mac's Applications folder and extract the program you will use to run the RoboTar software.  
  7. Prompts during Install:  There will be a prompt for language Selection.  Select the language and click Next.  Click Next on the following screen to continue with installation.  The default location is Application\RoboTar.  You can change this but it is recommended you leave this at the default.  You may receive a warning that the folder is already created.  This is ok since you created it in step 1.   Click Yes.  Select both packs to install (App and Songs) and click Next.  You should see the progress bars complete rather quickly.  At this point the install is complete and you can click Next one last time and Done to complete.
  8. At this point, the software is installed on your Mac.  You can find the RoboTar folder in your Application folder.
  1. Downloading Updates:  When running the RoboTar App (see below), the RoboTar app will check online if you are connected to the internet to see if an update is available.  If one is available, you can download the latest version of the software here:         

  2.          RoboTar Application Download


    To Install From the Download:
    1. After clicking on the "RoboTar Application Download" Link above, select "Save As" option and remember the location where the file is downloaded (a recommended location is "Applications\robotar" or look for RoboTarPC-0.3.3-installer.jar on your system.
    2. Double click the file you just downloaded   Application\RoboTar\RoboTarPC-0.3.3-installer.jar.   This assumes you saved the jar file in your Applications\robotar folder and the version is 3.3  If not, then substitute the path with your path location and the file name with the correct downloaded file name.
    3. You may be asked if you want to allow the "Java Runtime Environment" to make changes to your computer.  Click "Yes".
    4. You will be asked for your language.  Select English.
    5. You should see a "Blue Ahuizote" logo for RoboTar.  Click Next.  It will install the software in the default C:\RoboTar location.  This is the recommended install location.  Finish the remaining install steps.  


Run the RoboTar Software (Mac):
  1. Open the RoboTar folder in your Applications list.
  2. Look for the file named: RoboTarPC-0.3.3.jar.  If the version number has changed since these instructions were written, the file name will reflect a new version number (0.3.4 for example).
  3. Double click the RoboTarPC-0.3.3.jar file.  This will launch RoboTar.
  4. NOTE: You may have received some bonus songs on your USB drive.  If you copied all of the USB drive contents to your Applications\RoboTar directory, you can look for a directory called "Applications\RoboTar\Songs".  This is the location where you can load additional pre-created songs for RoboTar into your application.  Once they are loaded, RoboTar will remember them for the future.
  5. The best thing to do at this point is to read through the Users Guide "RoboTar - Help" listed below.


Install Figure 1:
Picture
Install Figure 2:
Picture
Install Figure 3:
Picture
Picture
Picture
Picture
Picture


RoboTar Support videos

Adjusting RoboTar Corrections (calibrating or "trimming" the servos/fingers):


Replacing a bad servo (Long video...  delicate parts... please do this at your own risk):

Powered by Create your own unique website with customizable templates.